Monday, 20 May 2013

Simplicity 2451 skirt


 Finished Skirt 
So I realise I have about a million and one things to upload on here - but I thought I would start with my most recent effort this weekend. All up this probably took about 8 hours. I had been looking for a nice skirt pattern and opted for this one because I liked the unique shape of the yoke and the concealed pockets. This is Simplicity Pattern 2451.
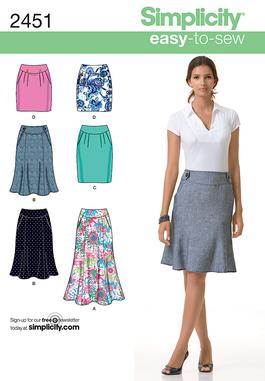
I made view D

I had found this pretty floral printed quilting fabric that I really wanted to make a skirt with (I usually team with black tights so knew it would contrast well)

See pics below for the journey :) 

  
First I laid out my pattern pieces on my folded fabric and pinned down. Then I cut them all out. remembering this time to cut my notches. Sometimes I forget and just slice away. Then I went though the process of marking the lines for darts, pleats and circles.


I then pinned the pleats at the front and machine basted.


 Next, I pinned the pockets to the front of the skirt, stitched on and understitched the seam. 

See below for understitched pockets


Then I pinned the pocket facing to the pocket and stitched on.
 
 I made darts in the back two pieces and stitched together up to notch (leaving room for zipper insertion.

 Finally, the back and front were ready to come together - and I stitched the sides.


 I applied fusible interfacing to front and back yoke pieces.

 I finished my seams by pinking (overlocker on the fritz and it is not really a fraying fabric) so it was okay.


 Even though the pattern does not call for it, I decided to insert a lining as well as I didn't want the cotton to catch on my tights. Plus it was quite thin and I thought this would finish it off better. I'd never done a lining before and there were no instructions since it's  not part of the pattern so I just winged it. re-cut the pattern pieced but pinned the pocket front on so that it would be the right size.

 This is the cut out front piece still pinned to pattern paper
 I then applied pleats, darts, stay-stitching and joined all pieced of the lining together. I inserted it inside the skirt and pinned then machine basted.


 I stitched the front and back pieces of the yoke.

 I pinned the yoke to the skirt.

 I then pinned in my zipper and stitched. I realised here that the zip was too short. The pattern instructions call for a 7" zip - so that is what I purchased, however it became clear that I need an 8" zipper. When I raised the zipper and the seam the skirt wouldn't fit over my bum, and when I moved it back down there was about a 1" gap left at the top. Eventually I overcame this by adding some pink ribbon to make a bow at the back as well as the required hook and eye closure at the top. It's quirky, but I like it.


 I then pinned and stitched on the yoke facing.


 I was going to finish my edge as per the instructions but didn't like the look of the stitches at the bottom being visible. So I applied a heavy duty fusible hemming web in first a thin layer at the bottom, then I folded this up and applied another layer to finish it off neatly. 
 
With the lining, I trimmed it to length then folded up twice to neaten the edge and did a straight stitch.
 
See images below of finished skirt. It was hard to find appropriate lighting to shoot the skirt. I also couldn't find many images I liked of it. It definitely looks much better in real life.


 yoke/pleats

 Close-up of pleats.

 Pocket.

 Back with emergency bow added :p

  The creases in the back are from my top underneath.

Overall, this was a really simple to make skirt (with the exception of the zipper debacle) I am definitely going to make this again. I would love to make it in a 1" black and white houndstooth wool. Perhaps with some black piping around the yoke. Definitely going to use a longer zipper next time though.

I hope you enjoyed reading this. Please feel free to leave comments :)

Alyce x

Tuesday, 15 January 2013

DIY Home-made corset/bustier


I decided a while ago that I would like to try and make a simple style corset/bustier with polyester boning and a hook/eye closure at the front. This type usually gives a slight shaping to the waist/hips rather than completely reducing/reshaping the waist like a steel boned corset with a solid husk closure. I had disassembled an old one I previously bought to see how it was constructed and then reassembled using some of the same pieces - however the back lacing was damaged and unusable. I wore it out one night with the back stitched together and a jacket covering the back! I then decided I would try my hand from scratch. I went to Spotlight and selected a nice colour satin which I liked and the other matierials I wished to use and got to work from there. The final result is as follows (apologies, but the photo is a selfie):

 The above is pictured with jeans, but I think it would look much nicer underneath a high-waisted pencil skirt.


 The following images are what I took as I went through the process of completing the bustier: 

 I decided to sort of 'cheat' since I wasn't after a really defined 'cinched' look. Cheating and skipping steps usually leads to trouble - but I was just experimenting so I decided to anyway. Usually a corset is assembled by multiple, curved pieces being assembled with boning inserted at these seams. I skipped this step and simply traced a large fabric piece from a corset I already have. Then I pinned a thick ribbon along where I wished to place the boning and stitched.

After I had sewed each strip of ribbon, I then inserted the boning and pinned an iron-on bias tape to the edges and applied. Now, this did cause some trouble with the final result. Ordinarilly, I would have used a sew-on bias binding to ensure a good amount of flexibility when wearing. However, the particular satin that I selected to make this corset was very delicate and was fraying like crazy. I'm talking up to 2 or more centimetres. So I could apply a fray stopper - my only way to salvage what I had already done was to apply an iron-on bias tape - the glue of which sealed the frayed edges and stopped more damage from occurring. Unfortunately, the iron-on tape has very little give and therefore reduced the flexibility of the pieces significantly.
 
  
After each piece had been boned and the raw edges sealed, I went to work making the back tabs with the eyelets which would be laced up. I had to try and repeat this process several times with a very sturdy and quality satin. This was bridal satin. All of the other types I tried ended up tearing when the eyelets were inserted. The eyelets were a bit of a pain. I don't have an eyelet applicator and the little tool that comes in the pack is tricky and needs to be hammered. I left many a dent in my counter top doing this!


The iron-on bias tape had a matte finish which didn't match the rest. Since the edges had already been stiffened beyond salvation with the iron-on bias tape I decided to use a thick satin ribbon to finish the edges rather than another bias binding.


On all of my bustiers with a hook and eye closure there was no boning where the hook/eye tape was - however mine just felt too flimsy, so I inserted some boning. As you can see from my picture - I used double boning for extra strength. I had also inserted some ribbon through the eyelets to check how it was sitting.


 Then I pinned on the final ribbon edging and the hook and eye tape and sewed on.


I bought a nice scalloped-edge black lace to apply to the top edge. I pinned it to the top and stitched on one row at the top and another following the shape of the lace down lower.


 I inserted the ribbon through the eyelets.


And voila! The final product! Front side:


Reverse side:


The next corset I make I think I am going to play by the rules. I am not unhappy with this one but I do prefer a good cinching/shaping corset and I think I would like to try that. I have certainly learnt a lot from creating this one and have recognised what I would do differently next time. Namely, use a good, strong satin to prevent the fraying nonsense which nearly ruined it!

I hope you enjoyed reading how I made this - If you have any questions, please leave me a comment!

♥ Alyce x