Tuesday 25 August 2015

DIY lace-up back pants


The inspiration for these little darlings came from the Bella SeƱora Lace up pants by Kitten D'Amour as seen here: 


Needless to say they are stunning and add a little oomph to what would otherwise be plain work pants.

However, as with many others fond of sewing, I looked at the picture and the $159.00 price tag and thought to myself "I could make that!" So I set about giving it a go. 

I purchased a pair of $20 cotton twill pull-on pants from K-Mart as well as some large eyelets from Spotlight. I opted to use red ribbon instead of black (mostly because my Spotlight store was sold out of black ribbon in the width I needed! But I like the contrast of black and red so it worked out! 


After much deliberation I decided instead of using the cut out effect as in the inspiration picture I could not cut out any of the leg and opt for a high contrast effect with the red on black. I wanted a mid calf lace up look so I marked 20cm from the rear hem along the back seam of the pants. I then unpicked both back seams to this point. I marked 2 cm out each side of the seam. Then along this line every 4 cm for where I would insert the eyelets. 


I then proceeded to insert the eyelets, sewed the back seam up again and threaded through my red ribbon.

And just like that I have some slammin' new duds! 


Style Notes:


Alannah Hill - My French Lover Lace Top - AUD $199.00


Thanks for reading!

Please feel free to comment, share and pin! 


Tuesday 30 June 2015

New Look 6184 Fitted Sheath Dress with DIY Contrast Foldback

Like most sewers, I adored the fold-back contrast on Gertie's Butterick 6094 Dress Pattern. I HAD to make one.

B6094, Misses' Dress

 I cut out all of the pieces for the straight skirt version and when it came time to check the tissue fit, I could tell instantly that this wouldn't work for me. The front bodice pieces are supposed to meet the waist band just under the bust. (See line drawing) 

Well the piece didn't even come to under my bust point! Troubles I suppose of being a 12G (US 34G). I also wasn't keen on the strange lining of just the fold back and then a facing (the rest of the dress is unlined for some reason)... So rather than deal with a whole bunch of drafting and fitting, I decided I would create my own version using New Look 6184 which I have made before here

I opted for the high neckline of View E this time to balance out the low fold back. 

I looked at the shape of the Butterick 6094 back pieces and drafted my own to go with New Look 6184.
I made the shell of the dress in black panama suiting, and FULLY lined this bad boy in a harlot red satin. I changed the vent to a split, so there are peeks of the red there too. Finished with two self-covered buttons and an invisible zipper. 
I absolutely LOVE the way this dress turned out. It fits like a dream. I used a size 14, and graded out the hips and bust at the peaks of each for a little wiggle room. 

See pics below:


Please feel free to comment, share and pin!


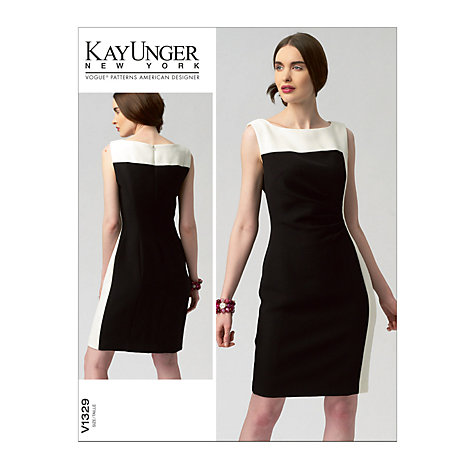
Vogue 1329 Kay Unger Colour Block Dress

Why am I being so boring?!?!?! I'm usually very creative with my fabric colour choices, now this is the SECOND dress I've made using the same colour scheme as the pattern envelope! 

This is Vogue 1329 by designer Kay Unger. I fell in love with the simple colour blocking and soft pleating. 

Line Art
It would appear that most other people who have made this pattern (at least those who have posted about it online) used a ponte knit to make it. I'm not a huge fan of the limited longevity of some knits (pilling/warping etc) so I thought I'd try something different. I was going to use my staple Panama Suiting fabric, but I was unable to find any white which was an "off-white" and I didn't want to use a "stark-white" so I opted for a crepe de chine for both the black and white contrast. 

Now, this is a fairly light-weight fabric so I knew that I may get different results from using this. I also interfaced the white pieces of the crepe de chine to help give a little more structure and more opacity. 
I lined dress so that each piece was mirrored with pongee lining in a corresponding colour. 

The instructions for inserting the lining were needlessly complicated, so I just inserted it as if it were a one piece facing. Gives a neater finish and requires no hand sewing. 

Overall, I am happy with the result, but I believe a sturdier fabric would have yielded better results. 

I accesorised the dress with a black and silver starburst brooch.

In the pictures the hem appears asymmetrical, however it was just hitched up on one side a bit and I didn't notice until after the photos were taken. The hem line is actually even. 


As always, please feel free to comment, share and pin!


Tuesday 23 June 2015

Simplicity 1777 1940's WW2 Era Gathered Dress


This pattern is a reproduction of a 1940's pattern by Simplicity. 

I had seen this pattern in the shops and online before, and over and over again I seemed to have the same 'meh' reaction. I'm not sure why. Then one day I just had this urge to make it. It was so bizarre. So I made a special trip to spotlight just to purchase it. 

As I am a History Teacher my love for all things WW2 is pretty obvious, and thus it's follow on effect for fashion. Not just the effect of rationing on hem length and circumference but how this is when American designers really became pronounced as once Paris was under Nazi occupation, there was no more relying on the fashion capital for the latest styling. A further note about Vichy France was how the designers, in attempts to mock the Germans and their Vichy supporters, made obnoxious and extreme fashions which were both garish and excessive. 

But whilst my fascination with 1940's and the fashion of the era is abundant, I am yet to create anything of the era as I found much of the military-inspired skirt suits with padded shoulders were simply not my style and would, on me, perhaps be more reminiscent of the 1980's than the 1940's. 1777 however was a simple dress, without hard shoulders, and some lovely gathers.

I cut a straight 14 for this design. I chose to use a deep red crepe de chine with contrasting black crepe de chine a la the pattern envelope. (what happened to my originality here?!!?) I lined the bodice and skirt of the dress using bemsilk lining and made a self-facing for the contrast yoke. The patterns calls for a faced yoke but the rest of the dress remains unlined. I don't care for unlined garments. 

The lining presented a challenge (I love making things difficult for myself apparently) as if I were to create as a standard lining (inverting of regular pattern pieces) the bulk of the gathers sitting against each other would have been extreme and I was already concerned about the effect of all those gathers around the tummy and waist. So I inserted the lining as you would an interlining around the bodice yoke (treating the shell fabric and lining as one piece) then attached to the rest of the bodice in the usual lining way as an inverted copy of the dress. Whilst it took a lot of fiddling and forethought, it worked out well, reduced the bulk and ensured a beautiful finished inside. 
I doubt I will sew this design again as it is quite unique, although if I were to I would add more ease to the bust area as the gathers seem to pucker as they are pushed underneath. Overall I think this dress looks quite classy and I'm happy with how it turned out.

I considered doing victory rolls for my hair in the photos but it was late and I didn't have the energy so I just pinned my hair up in a way that looked vaguely 1940'sesque. I tried a couple of classic pin-up poses as well as the salute, yet I feel I look rather stupid in both. I certainly felt stupid doing it. 

See pics below


Thanks for reading!
Please feel free to comment, share and pin!