


This started out as I wanted to make gift for a friend and also test my sewing skills. I was originally going to make Baymax from Big Hero 6 - which would have been much simpler with only a few simple pattern pieces. But no, I have to go and make things difficult for myself and make a Toothless with a seemingly infinite number of intricate pattern pieces.
I searched the internet for a while and there's a large array of patterns out there. There's a few free ones on DeviantArt and such, however the pattern pieces are either hand drawn or tablet drawn and featured minimal instructions. So I decided to turn to etsy. I found one which I liked and thus purchased for $19.80 from munchforlunch's etsy store here. What I particularly liked about this pattern over the others was that it was considerably large, more detailed, featured clear illustrator drawn pattern pieces and some thorough instructions. Furthermore the download included a .PES file for an eye so that you may embroider them directly onto the pieces using your embroidery machine. I was thoroughly impressed with the embroidery file as it wasn't a basic block colour or uniform stitching there was cross-hatching of yellow and lime green to create depth in the eye as well as the eye being finished with a satin stitching.
After purchasing this pattern it is immediately available for download. So I printed the pieces on my at-home printer and got to work cutting them out and assembling those which required joining to larger pieces (eg. tail, gusset and wings). The pattern includes 2 options for wings, a very large but to scale wing or a little itty bitty wing. I chose to use the full sized wing for the greatest dragony effect!
I purchased 1.5 metres of Black Polar Fleece from Spotlight for about $9 a metre. I chose fleece because I wanted Toothless to be soft and snuggly but also didn't want to make sewing the fabric too complicated by using a slippery or overly stretchy fabric or something with a nap that would make cutting and assembling pattern pieces a nightmare. The pattern pieces are marked X1 or X4 or not at all indicating it should be cut on folded fabric to achieve 2. One one of the tail fins there was no X4 marked where there should have been (the ones near his bum, not the tip of the tail where he should only have 1 fin!)
The pattern does not include a seam allowance so you need to remember to allow for this when cutting out the pieces to ensure that there is room to join him together. I allowed a roughly 1 cm seam allowance on all pieces. Several of the bits are quite fidgety as there are many tiny scallops to create for his ridges and spikes, and some very vigorous use of my point turner was necessary. Also matching up pattern pieces to their seam partner is difficult with no notches provided on the pattern. With an approximate seam allowance, this is made even more difficult as once you figure out what goes where and which way they won't line up exactly unless you precision measure, trace and line out your seam allowances to mathematic perfection. For this reason there was some frantic ripping and unripping of seams, particularly when assembling his head.
As this was a gift, I embroidered the giftee's name on the bottom right foot pad to make it more personalised. I did this using Gutterman Filmoplast and adhering the cut pattern piece to the embroidery hoop. I did the same thing for the eye pieces. The fates were against me as I did the embroidery. I suffered a power outage during the embroidery of the second eye which after careful, precision placement of the design on the piece was now reset and I had to skip through the design several times stitch by stitch trial and unpicking to get it right again! Whilst embroidering the name on the foot, my needle broke halfway through one attempt, when I tried to change it I dropped it into the embroidery carriage by mistake and it became lost to the depths of mechanics. I frantically shook and shimmied the carriage and with the help of a big magnet, rescued the rebelling needle. My second attempt yielded a fraying thread which resulted in my machine practically eating the foot. My third attempt resulted in the thread constantly snapping, so after switching to a pure cotton in a similar colour I was able to finally complete the design (but had to cut out 3 more feet pieces!!!)
The instructions include a suggested assembly sequence, whilst I followed the steps I assembled the head first and body later. Originally I placed the ears as instructed in the diagram, lower on the head and with ridges facing out. Yet after consulting some photographs of Toothless looking his cutest his ears are raised higher with the ridges facing in, so I unpicked and switched their placement. See below:
Suggested ear placement:
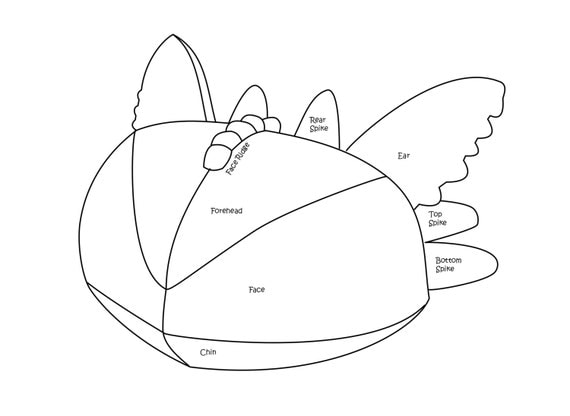
Head with suggested ear placement:

Cute Toothless with raised, turned in ears.

This is the belly gusset with my seam allowance included. You can see the join line for the pattern pieces as well as where the dart must be sewn.

See further pattern pieces laid out below:


This is an image of the leg pieces pinned on to the body and gusset pieces ready to be stitched.


It did get a bit tricky sewing some of the fiddly bits in especially when there's four legs and a long tail wedges inside the body and you're trying to sew wings into the sides!!
This is one of the more complicated and time consuming things I've made! I'm not sure I'll be in a hurry to make one again because it certainly wasn't quick or easy. But somewhere along the line I'm sure I'll make another one (or two, or three...).
I guess if it was this complicated to put together, drafting the pattern would have been painstakingly complicated. So I think given all it's fiddly bits, this is a very well created pattern, very detailed with good instructions. Whilst it's tricky - it's because of the nature of the design rather than flaws with the pattern itself. And once completed (after using an almost unbelievable amount of stuffing) he sure looks pretty good!
See below:


As I was under the pump to get this made, I didn't have time to create Toothless's red prosthetic tail fin. I might have to make at a later date and give to his new owner. I'll be honest, it was hard to let this little fella go! But he went to a loving home:
See Toothless getting cuddles from his proud new owner:

I hope you enjoyed reading this. If you have any questions please comment and I'll get back to you as soon as I can.
Please feel free to like, comment, share and pin.